[czytaj tego posta po polsku]
Problem
when filming from a free hand, usually the resulting video clip is more or less shaky due to the motion of the hand and the body of the camera holder. When panning or making any other trajectory with a camera in a free hand, the motion is far from perfect. Even if holding a camera aimed at one spot and trying to keep a still frame you will see lot of unwanted motion in the resulting clip. In some cases even a heartbeat/pulse can cause a camera to move when we don't want it.
This problem arises drastically when we want to hold the camera and also move around while holding it. This technique is called "steady cam" or "steadicam", but trying to use it from a freehand you'll most likely be far far away from a smooth movie-like results.
Solution
There are solutions to stabilize the camera to fix the problem of shaky clip. One great type of solution are mechanical steadicam stabilizers. These help you to hold a camera thru a mechanical system that will isolate all unwanted/disturbing motion coming from your buddy from the camera itself. This is the type of camera stabilization that I will not talk about in this article.
What I will be talking about here is a technique for stabilizing a clip in the post - means, after it was already taken. This is possible, by processing a clip with a video stabilizing software. As for the software itself - there are more than one tools to choose from, and I will be strongly focusing on one particular tool, that is a freeware too - VirtualDub. But first things first, let's go thru some basic theory.
Camera built-in stabilization
Just to cover this one more thing - lot of cameras these days have a built-in video (or photo) stabilization function. This can have a bit of the mechanical solution in it but mostly is similar to the post way. So in the mechanical way, the camera could have a gyroscope/accelerometer to be aware of how it moves and could have a light capturing module suspended on some engine that could move it relatively to the motion of the rest of the camera, keeping it as steady as possible in relation to the scene. But most of what is available out there, would be more like a post stabilizing rather. Same data from the accelerometer/gyro could still be used, but then, after each frame is captured and after it gets saved into the camera's storage it can go thru an embedded software (firmware) that can decide to alter it, so that in the stored clip the stabilization is already applied. Even then, a post stabilizing on a PC can bring further improvement.
De-shaking the video - Theory
A videoclip is a sequence of still images - frames - passing one after another. Each frame, just like a photo, contains some scene. When filming from a free hand, that scene is not constant as the camera moves, please see the conceptual explanation below.
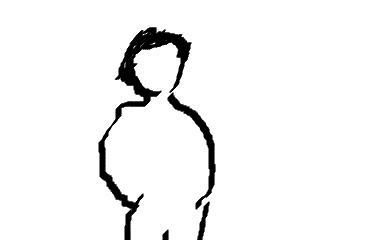
First we introduce a scene, where a person is standing in an empty space:
Now, when we film this scene, we can only capture a portion of it thru a rectangle of our camera's "vision":
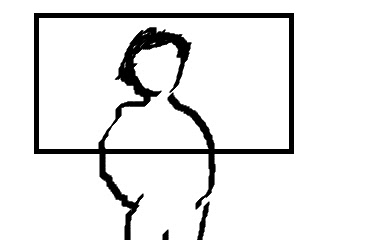
So the thinck rectangle represents what our camera "sees". If we were filming from a tripod, that square would stay still, but since we're filming from a free hand, most likely it will move as the camera is moving slightly in all the directions as our hand is not a robo-arm and does not remain still:

So when shooting from the free hand, all the movement that our body does, even the smallest ones, will cause the camera to move in relation to the scene, and when we later watch the clip the scene is shaky within the video frame:

1. Finding the common square for all the frames (tracing the camera motion)
2. Align frames to have the filmed object in the same location within the frame (locking)
3. Optionally: getting rid of "edges" or compensating out-of-frame spaces
So first we need to find a common square, for two sample frames we would try to overlay them:


That brings us to the step 3 - as it is not mandatory, I always go thru it, since I'm not happy with stabilized video with jumping black edges. This step is very straightforward, we choose the common region, and for each frame we only use this region, center the frame on it, and... ZOOM IN AT IT all until it covers the whole frame:

Is that a big problem though? Well i depends how you look at it. The average standard resolution for DVD in MPEG-2 at 25 fps format is at 720x576 pixels. When we watch a movie like that on a PC we get much higher screen resolutions and when watching it in full screen the image is zoomed-in at (sized up). We still enjoy the quality, because for an average human eye there is still enough details to see the image quality as high.
My way: Shoot 1080p for 720p movies
There is usually more than one approach to anything, so what I like to sometimes do as a good practice, is to shoot the scenes at higher resolution than I intend to use for the final footage. For example, if I intend to make a movie in 720p, I would record free-hand scenes at 1080p, then stabilize and downsize to 720p. Most likely the "common rectangle" from 1080p scene would still be bigger than 720p, so by downsizing it all to 720p at the end, I'm avoiding the necessity for upsizing the image - I downsize it instead - which by default results in better quality.
Remark on the "common rectangle"
in a long scene, the shaking of the camera is usually a random thing. Means, that during some period of a scene the camera shakes more, while in some other - less. This means, that it may sometimes be beneficial, to "divide" the scene into chunks (only divide in mind) and stabilize each chunk separately. Why to bother? Say, the first half of the clip has very low shaking. Now, the second part, contains some more violent shaking. when stabilizing the first half only, the common square would be bigger, than the one for the second half of the clip. Now, it shows, that the whole first half of the clip, could be stabilized with the bigger common square, means: no need to zoom in too much! The second half of the clip has more aggressive shaking, therefore, we would have smaller common square and we would have to zoom in more, loosing more of the original scene. Even more, we can then have a smooth panning zoom between these two halves of a clip. Just like if the zoom was applied with a camera during the shooting. So there is quite a bit to consider in the stabilization process - especially here - when it comes down to deciding which parts of the scene to cut from the original video to be used in the final production.
This ends the first part of video post stabilization article. Remaining parts will cover:
Part #2 - Introducing to VirtualDub, and it's Deshaker plugin for video stabilization
Part #3 - Automating and speeding up the work with Deshaker
Brak komentarzy:
Prześlij komentarz